With Java 9 just around the corner, we explore one of its most exciting new features – the Java 9 REPL (Read-Eval-Print Loop). This REPL is called JShell and it’s a great addition to the Java platform. Here’s why.
With JShell you can easily try out new features and quickly check the behaviour of a section of code. You don’t have to create a long-winded dummy main or JUnit test – simply type away. To demonstrate the versatility of JShell, I am going to use it in conjunction with the Eclipse January package for data structures. Eclipse January is a set of libraries for handling numerical data in Java, think of it as a ‘numpy for Java’.
Install JShell
JShell is part of Java 9, currently available in an Early Access version from Oracle and other sources. Download and install Java 9 JDK from http://jdk.java.net/9/ or, if you have it available on your platform, you can install with your package manager (e.g. sudo apt-get install openjdk-9-jdk).
Start a terminal and run JShell: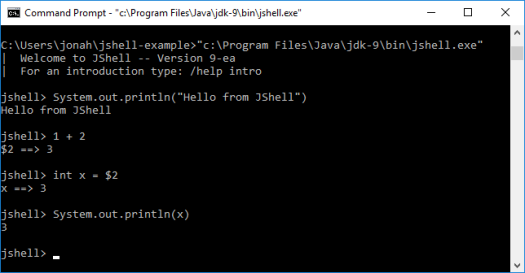
As you can see, JShell allows you to type normal Java statements, leave off semi-colons, run expressions, access expressions from previous outputs, and achieve many other short-cuts. (You can exit JShell with Ctrl-D.)
Using JShell with Eclipse January
To use Eclipse January, you need to:
1. Download January:
Get the January 2.0.2 jar ( or older version January 2.0.1 jar).
2. Download the dependency jars:
The January dependencies are available from Eclipse Orbit, they are:
- org.slf4j.api – 1.7.10
- org.slf4j.binding.nop – 1.7.10
- org.apache.commons.math3 – 3.5.0
- org.apache.commons.lang – 2.6.0
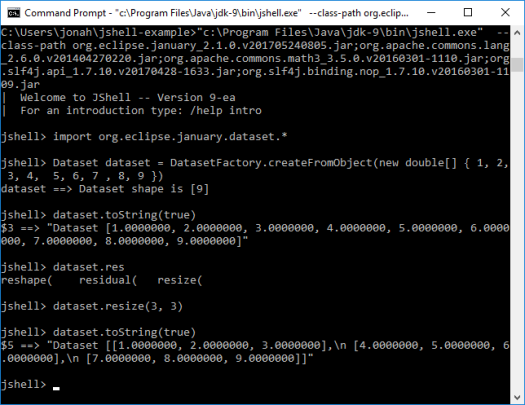
3. Run JShell again, but add to the classpath all the jars you downloaded (remember to be the in the directory you downloaded the jars to):
Windows:
"c:\Program Files\Java\jdk-9\bin\jshell.exe" --class-path org.eclipse.january_2.0.2.v201706051401.jar;org.apache.commons.lang_2.6.0.v201404270220.jar;org.apache.commons.math3_3.5.0.v20160301-1110.jar;org.slf4j.api_1.7.10.v20170428-1633.jar;org.slf4j.binding.nop_1.7.10.v20160301-1109.jar
Linux:
jshell --class-path org.eclipse.january_2.0.2.v201706051401.jar:org.apache.commons.lang_2.6.0.v201404270220.jar:org.apache.commons.math3_3.5.0.v20160301-1110.jar:org.slf4j.api_1.7.10.v20170428-1633.jar:org.slf4j.binding.nop_1.7.10.v20160301-1109.jar
Some notes:
Some version of jshell the command line argument is called -classpath instead of --class-path
If you are using git bash as your shell on Windows, add winpty before calling jshell and use colons to separate the path elements.
Then you can run through the different types of January commands. Note JShell supports completions using the ‘Tab’ key. Also use /! to rerun the last command.
Import classes
Start by importing the needed classes:
import org.eclipse.january.dataset.*
(No need for semi-colons and you can use the normally ill-advised * import)
Array Creation
Eclipse January supports straightforward creation of arrays. Let’s say we want to create a 2-dimensional array with the following data:
[1.0, 2.0, 3.0,
 4.0, 5.0, 6.0,
 7.0, 8.0, 9.0]
First we can create a new dataset:
Dataset dataset = DatasetFactory.createFromObject(new double[] { 1, 2, 3, 4, 5, 6, 7, 8, 9 })

System.out.println(dataset.toString(true))
This gives us a 1-dimensional array with 9 elements, as shown below:
[1.0000000, 2.0000000, 3.0000000, 4.0000000, 5.0000000, 6.0000000, 7.0000000, 8.0000000, 9.0000000]
We then need to reshape it to be a 3×3 array:
dataset = dataset.reshape(3, 3)

System.out.println(dataset.toString(true))
The reshaped dataset:
 [[1.0000000, 2.0000000, 3.0000000],
 [4.0000000, 5.0000000, 6.0000000],
 [7.0000000, 8.0000000, 9.0000000]]
Or we can do it all in just one step:
Dataset another = DatasetFactory.createFromObject(new double[] { 1, 1, 2, 3, 5, 8, 13, 21, 34 }).reshape(3, 3)

System.out.println(another.toString(true))
Another dataset:
 [[1.0000000, 1.0000000, 2.0000000],
 [3.0000000, 5.0000000, 8.0000000],
 [13.000000, 21.000000, 34.000000]]
There are methods for obtaining the shape and number of dimensions of datasets
dataset.getShape()
dataset.getRank()
Which gives us:
jshell> dataset.getShape()
$8 ==> int[2] { 3, 3 }

jshell> dataset.getRank()
$9 ==> 2
Datasets also provide functionality for ranges and a random function that all allow easy creation of arrays:
Dataset dataset = DatasetFactory.createRange(15, Dataset.INT32).reshape(3, 5)

System.out.println(dataset.toString(true))
[[0, 1, 2, 3, 4],
 [5, 6, 7, 8, 9],
 [10, 11, 12, 13, 14]]
import org.eclipse.january.dataset.Random //specify Random class (see this is why star imports are normally bad)

Dataset another = Random.rand(new int[]{3,5})

System.out.println(another.toString(true))
[[0.27243843, 0.69695728, 0.20951172, 0.13238926, 0.82180144],
 [0.56326222, 0.94307839, 0.43225034, 0.69251040, 0.22602319],
 [0.79244049, 0.15865358, 0.64611131, 0.71647195, 0.043613393]]
Array Operations
The org.eclipse.january.dataset.Maths provides rich functionality for operating on the Dataset classes. For instance, here’s how you could add 2 Dataset arrays:
Dataset add = Maths.add(dataset, another)

System.out.println(add.toString(true))
Or you could do it as an inplace addition. The example below creates a new 3×3 array and then adds 100 to each element of the array.
Dataset inplace = DatasetFactory.createFromObject(new double[] { 1, 2, 3, 4, 5, 6, 7, 8, 9 }).reshape(3, 3)

inplace.iadd(100)

System.out.println(inplace.toString(true))
[[101.0000000, 102.0000000, 103.0000000],
 [104.0000000, 105.0000000, 106.0000000],
 [107.0000000, 108.0000000, 109.0000000]]
Slicing
Datasets simplify extracting portions of the data, known as ‘slices’. For instance, given the array below, let’s say we want to extract the data 2, 3, 5 and 6.
[1, 2, 3,
 4, 5, 6,
 7, 8, 9]
This data resides in the first and second rows and the second and third columns. For slicing, indices for rows and columns are zero-based. A basic slice consists of a start and stop index, where the start index is inclusive and the stop index is exclusive. An optional increment may also be specified. So this example would be expressed as:
Dataset dataset = DatasetFactory.createFromObject(new double[] { 1, 2, 3, 4, 5, 6, 7, 8, 9 }).reshape(3, 3)

System.out.println(dataset.toString(true))

Dataset slice = dataset.getSlice(new Slice(0, 2), new Slice(1, 3))

System.out.println(slice.toString(true))
slice of dataset:
[[2.0000000, 3.0000000],
 [5.0000000, 6.0000000]]
Slicing and array manipulation functionality is particularly valuable when dealing with 3-dimensional or n-dimensional data.
Wrap-Up
For more on Eclipse January see the following examples and give them a go in JShell:
- NumPy Examples shows how common NumPy constructs map to Eclipse Datasets.
- Slicing Examples demonstrates slicing, including how to slice a small amount of data out of a dataset too large to fit in memory all at once.
- Error Examples demonstrates applying an error to datasets.
- Iteration Examples demonstrates a few ways to iterate through your datasets.
- Lazy Examples demonstrates how to use datasets which are not entirely loaded in memory.
Eclipse January is a ‘numpy for Java’ but until now users have not really been able to play around with it in the same way you would numpy in Python.
JShell provides a great way to test drive libraries like Eclipse January. There are a couple of features that would be nice-to-have such as a magic variable for the last result (maybe $_ or $!) and maybe a shorter way to print a result (maybe /p :-). But overall, it is great to have and finally gives Java the REPL and ability to be used interactively that many have gotten so used to with other programming languages.
In fact we will be making good use of JShell for the Eclipse January workshop being held at EclipseCon France, see details and register here: https://www.eclipsecon.org/france2017/session/eclipse-january